How to test Open Layers React components with Mocha (part I)

I noticed that online there aren’t a lot of guides for testing OpenLayers React components. For a big project I worked I had to include OpenLayers in React and when the testing phase came about I ran into a few hurdles that needed a bit of experimentation to be overtaken. With this post I want to share with you how I set up a minimal testing environment for an OpenLayers component rendered with React.
This tutorial is based on the test setup I made for Create React App based on Mocha, Chai, Enzyme and assumes you already have a test setup in place, here is how you can make your own. If you want to use a different testing engine (i.e. Jest), you could get inspiration from here but there are parts in which the two test runners are substantially different and you may want to search elsewhere to find resources for your configuration. I have also made GitHub repository with the finished example.
- Install/configure jsdom and canvas
jsdom is a testing utility that will instantiate a “virtual” browser, implementing the HTML standard in a global virtual document in which we can render/mount our components to be tested. Jsdom is required because OpenLayers on its instantiation looks for HTML elements such as <canvas> and we need a browser, in this case is virtual, to test the library. To install jsdom we will do:
npm install jsdom --save-dev or yarn add jsdom -dev
jsdom does support <canvas>as an external dependency and it has to be installed separately and included in our HTML document. The package can be found here, and can be installed like this:
npm install canvas --save-dev or yarn add canvas -dev
Once we installed jsdom we have to create a file in where we instantiate our HTML document in the global scope. This has to happen before we start our tests since OpenLayers requires an HTML to attach itself if we want to test it. The following filesetup.js would do the job, this is the same you’ll find on the Enzyme docs page for Jsdom (except the canvas requirement).
We will place the file in our React app root folder.
|--test-openlayers
      |--src
         |--test
            App.test.js
          App.css
          App.js
          index.js
          index.css
          logo.js
          logo.svg
          ...
   babel.config.js
   setup.js
   ...
Once we have created this file we will require it within test launching, with Mocha’s require flag. Just like we did for Babel in our previous tutorial we will add--require setup.jsto our test script in package.json.
2. Install and include OpenLayers in our application
OpenLayers is a well known and used mapping library in the webGIS environment. It’s been around for a and I have used for long. For those who want to know more about it here is the official page. Let’s install it in our React app:
npm install ol --save or yarn add ol
Once it is installed we will create a simple map as a React component, becoming a child component of our main App component. We will then add a new file Map.js and we will create new instance of an OpenLayers map object there, as follows:
We will then import and use our MapComponentin our App
We will also have to import the Openlayers stylesheet. We can import it in the global scope adding a link to our main page in public/index.html.
<link rel="stylesheet" href="https://cdn.rawgit.com/openlayers/openlayers.github.io/master/en/v5.3.0/css/ol.css" type="text/css">Since we are going to add more components to our application page we will make the map smaller and we will position it at the centre of the screen, using the css flexbox properties. Change the App.css file, specifically the .app class as follows (see older browsers’ support for display: flex online):
.App {
    text-align: center;
    display: flex;
    align-items: center;
    justify-content: center;
    height: 100vh;
}
We will also reduce the size of the map to the half of its current width and height, on Map.js just before the render() method change the inline style declaration:
render() {
    const styles = { height: '50%', width: '50%'}
    return(
        <div style={styles} ref={this.setMapRef}></div>
    )
}
3. Add some functionality to the map
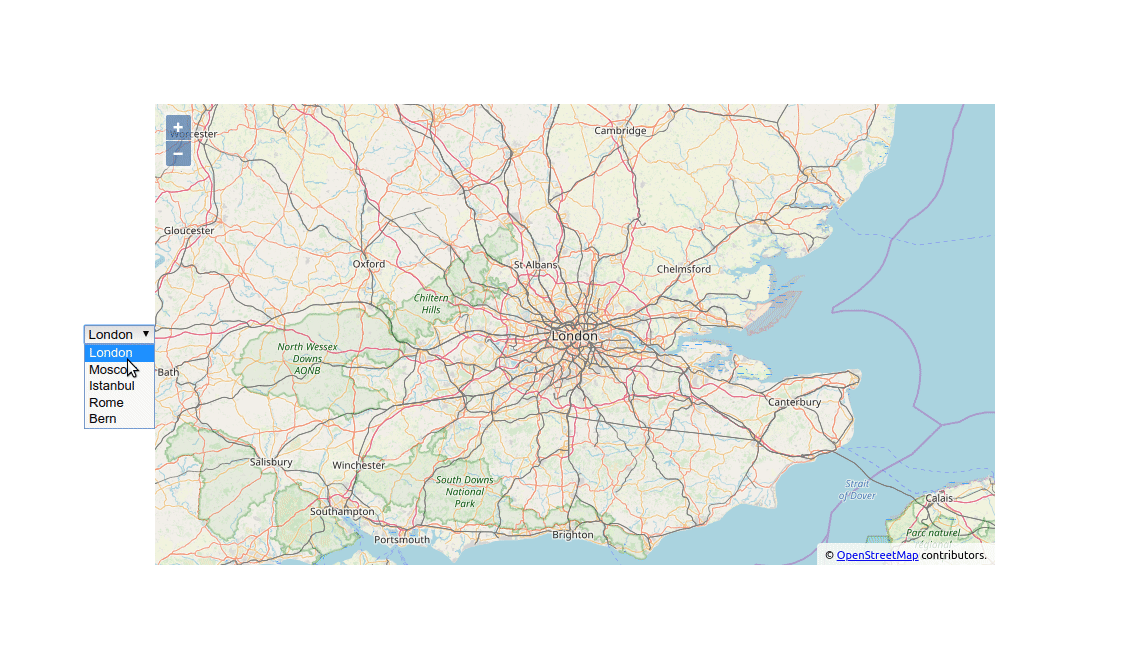
We will add a functionality that we will test later on, a drop down list from which the users will select a city. The map will gently pan using an animation to the location of the selected city. Nothing too complicated to start with but effective to test event driven changes on the map.
We will have an initial state directly linked to the centre of the map, which (x,y) are those of the first pre-selected city in the drop down list. The state and the function that responds to the drop down onChange events will be kept in our App component, the parent. MapComponent is a child of App, it will receive the coords of the selected city as props passed from the parent. LocationsSelect is the other App’s child component, the onChange event function in the parent is passed to it as a prop. When the user selects a new city the coordinates are sent from LocationsSelect to App, which will update its state and Map’s view center property within the componentWillUpdate method, causing the map to move to the selected location.
We will add two more components LocationsSelect and MapComponent; the first one will stay in our App.js file while we will create a separate file Map.js for the second as we will add one more behaviour later on. The structure of our package folder will be like this:
|--test-openlayers
      |--src
         |--test
            App.test.js
         App.css
         App.js
         index.js
         index.css
         logo.js
         logo.svg
         Map.js
         ...
      babel.config.js
      setup.js
      ...
And our App.js and Map.js files will become like this:
Our React Openlayers application will now look and act like this:
4. Transpile and polyfill the ol library
The Openlayers javascript package called ol, in the version used for this tutorial 5.3.0 is written in ES6/ES2015. Since our to-be-tested components import this package and Mocha does not support ES6/ES2015, we will have to transpile the node_modules/ol before starting any test on our application. To do so we will use @babel/register as we did in our previous example but this time we will use the ignore flag in our configuration. Doing so will get Babel to transpile only the ol module and submodules before running any test. The ol modules use some of the ES6 features, as described here, we will have to install @babel/polyfill and require them before running the tests.
First we will install @babel/polyfill :
npm install @babel/polyfill --save-dev or yarn add @babel/polyfill -dev
We will move our test configuration in a new file called babel-register.js. Here, we are going to require our @babel/polyfill and @babel/register with the ignore property. This property is an array containing the /node_modules\/(?!(ol)\/)/ regex that tells Babel to transpile only the files in only in the ol sub-folder of node_modules having the specified extensions , the file will look like this:
and it will be placed in the root directory of our application:
|--test-openlayers
      |--src
         |--test
            App.test.js
         ...
         index.js
         Map.js
         ...
      babel.config.js
      babel-register.js
      setup.js
      ...
Before proceeding to the next part we will have to change our “test” entry in the scripts in package.json to reflect the new testing configuration we have just created.
If you are on Linux it will be
"test": "NODE_ENV=test mocha --require babel-register.js --require ignore-styles --require setup.js src/test/*.test.js"On Windows it will be
"test": "set NODE_ENV=test&& mocha --require babel-register.js --require ignore-styles --require setup.js src/test/*.test.js",5. Test the map object (part I)
The test workbench is now built, we have everything we need to start testing our OpenLayers react components, we will start with the first behaviour, we will test if the map changes its coordinates when the user changes the selection on the LocationsSelection drop down component. In this test suite we will use the mount function of Enzyme that will render a virtual map on our virtual browser and Chai will be used as our assertion library.
In the first test spec we simply print the HTML string representation of the drop down list component in jsdom browser, comparing it with a the same representation we would expect.
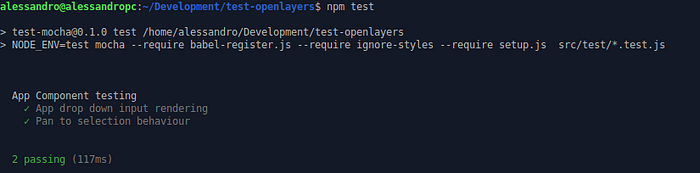
In second the test spec we will test OpenLayers in our MapComponent, we first check if the component has been rendered then we we mock a change event with the simulate method of Enzyme on the LocationsSelection component. Note how we invoke this method, the first argument is a string that defines the event type, the second is a mock event object that has only the bits we need to pass down the panToLocation function. For testing the map behaviour we don’t need all the properties but only the index of the selected item target -> selectedOptions -> index. The panToLocation method on the App component will work out the new coordinates. Lastly, we check if the map actually has panned to desired location. We create an instance of the MapComponent to get to the olMap OpenLayers map object, we grab the coordinates of the centre of the current view and we compare them with the coordinates of the selected item (converted to EPSG:3857). Now let’s open our terminal and do an npm test or yarn run test, this is what you should see.
In the example above we tested directly the ol map object passing a prop that modifies its representation. There are many other tests you could perform on the map object (i.e. if the map renders correctly, if the map is centred/zoomed correctly on start-up, etc.). If you understood how the testing logic works and you feel confident enough start testing on your own what we have done so far is a good place to start. If you want to follow another example and extending your knowledge click here or on the image below, in the next part we are going to test an ol/interaction object.